-
Art Auction for QED
Hey there! How are you? I started painting about a year ago and shared some of my work online along the way. Folks asked if I’d ever sell my work. I didn’t intend to but, well, I didn’t intend to get wrapped up in a pandemic either so…
Money raised will go directly to QED and a portion to our friends at Mount Sinai Queens where I had surgery and treatments for cancer. They are the heroes here. My heart is aching for the special village we’ve carved out of the big city of New York. Thank you for your bid and contribution to making sure we can rebound from this. The pendulum will swing back. It always does.
The eBay collection is not live yet so it’s blank but here’s the link. And if you want to check them out on the QED site, here you go. 🙂 I might add a few more over the next few days.
-
Learning to Watercolor
I spent the New Year’s Day holiday up at the Rock House with Christian and my father-in-law, sitting around the fire, watching movies, doing a puzzle, making (and eating) beef stew and a chicken burrito bowl in the crock pot, and some homemade cookies and cream ice cream.
I also had some more fun with my Let’s Make Art subscription box. I painted a cardinal and a pickup truck with a tree using patterns I traced with carbon paper. The bird’s tail got messed up when I dropped the painting while it was still wet, and it landed flat on its face. Oops. But it wasn’t such a great work of art to begin with so no harm, really. I definitely enjoy painting along with the tutorials if solely for the fact that I’m unable to do anything else (read about the Mueller investigation or anything Trump, check Twitter or emails, etc.).
I look forward to learning a little more about how to handle the colors and the patience to let parts dry before tinkering with them. But even if this is as good as I get, the unplugged time is all I really want or care about right now. It was a lovely holiday and a peaceful start to the New Year.
Every New Year’s Eve, I keep saying good riddance to the year before as each has been chock full of challenges. But this year it’s become clear: this is just my life and my life is really challenging right now. I can hope for an easier time of it but, in the meantime, my (continued) resolution is to enjoy all the books, plays, comedy, arts, crafts and the mix of city and country life as much as I can even if the moments are fleeting.
Happy New Year to us all!


-
DIY Wall Plate Rack
 Last winter, during my cancer treatment and recovery time off, I got busy! I designed and built this wall plate rack with the aid of my mom. We almost killed each other during assembly, but we did it!
Pinterest will send you down a K-hole of design ideas but you’ll walk away without concrete plans. So I found a design plan on Ana White’s site that I tailored to fit my liking and specific space and dimensions. It’s very easily adaptable and all the pieces you need are easily found and cut to size at your local lumber store for super cheap. Cheaper than most anything you’ll buy online anyway.

The design itself is so very basic and simple that you don’t really need any blueprint but sometimes it’s nice to have a clear vision and shopping list, especially before walking into a Home Depot which suddenly erases every clear thought I’ve ever had.
I added bead-board on the back to make it look a little more polished, and I’d still like to add some molding or stenciling to add more visual interest. But it’s already been immensely useful, clearing up room in our only cupboard and keeping dishes super handy and easily accessible.

Laying out the plan 
Glued dowels on the front of the shelves 
Watching paint dry 
Mid-Assembly 
All assembled 
Deciding where to hang it 
Hung with care! 
Finishing touches!
All done! 
All done! -
Let’s Make Art – Watercolor Painting Kits
I painted for the 1st time in my life tonight* thanks to @letsgomakeart! I treated myself to their December monthly subscription box which included four watercolor painting kits. The kit arrived in a jiffy and was well packed and sorted. Tonight I followed along with Sarah Cray’s tutorial on YouTube and painted the flowers for week 1. Watercolors will definitely take some getting used to and a few trials and many more errors but she kept it breezy and simple. Even though I’m a complete novice, I still skipped forward a few times to trim the “fat” of the video and rewound a few other times to review a technique before dipping my brush into anything.
After my flowers were done, I decided to try painting the luna moth (individual kit available on their site) even though I didn’t have the kit, because it’s pretty and I was having fun. Even though I didn’t have the colors I needed, it still turned out great! Watercoloring will take some getting used to but it was quick and fun and easier than I expected. I will definitely try the luna moth again when I have the right colors as it is gorgeous. We have luna moths here at the cabin every spring / summer and they truly are works of art.
Anyway, here’s how I spent my evening!**
*My paint by numbers don’t count!
**Well, about an hour or so of it. I spent the rest of the night making homemade rocky road ice cream, finishing up the last chapter of Inhuman Bondage, watching Survivor and answering emails for QED. A pretty great night off!
Supplies in order! 
Here we go! 
All done! 
Not great but I did it! 
Luna moth tutorial 
Luna moth -
DIY Shower Steamers a/k/a Vapor Discs
Mom and I whipped together these wonderful little shower steamers to give to all my favorite special snowflakes for the holidays. Instructions below the photo gallery.


I love a good bath bomb, but I know lots of folks who don’t like baths and taking one seems more labor intensive. An alternate is to the bomb is this little vapor disc or shower steamer. As the fizzy disc dissolves in your steamy shower, it releases the wonderful aromas of an essential oil blend of your choosing. For the gifts I made, I chose a therapeutic blend for congestion and stuffy noses.
I make my steamers in batches of 12 at a time using the recipe below. To make fewer
I like to make these individually rather than a large batch of just one scent, that way I can use them for whatever use I want or give them away as personalized gifts. This is why the essential oil blends below, are to drop directly onto the dry/cooled shower steamer discs, rather than mix into the mix. I like to use silicon molds and mini muffin pans to make these in all sorts of shapes! Many blogs talk about using muffin liners, but you do not have to use them! If the mixture is not fully dried/hard, it will not come out of the pan or it will crumble out in pieces. All you have to do is allow the mixture to dry for a few more hours, and then turn the pan upside down over a cloth. Knock on the bottom of each of the muffin cups, to help release them from their cup.INGREDIENTS
- 2 cups baking soda
- 1 cup citric acid
- 1 cup cornstarch
- 3-5 Tbsp. filtered water (depends on humidity levels in your home)
- essential oils (use whatever scents float your boat and blends for your needs.(2 per disc if you’re making a smaller batch or experimenting with blends)
- I used a blend for congestion and stuffy noses:
- 1 tsp eucalyptus essential oil
- 1 tsp drops lavender essential oil (2 per disc)
- 1 tsp drops peppermint essential oil (2 per disc)
- 1 tsp drops rosemary essential oil (2 per disc)
DIRECTIONS
-
- In a bowl, combine baking soda, citric acid, and cornstarch mixing until no lumps are present and then add and mix in essential oils*.
- Add water to the bowl, 1 tablespoon at a time. Add your tablespoons until the mix sticks together and packs like a snowball. It will seem dry but packing it will be easy and possible. You can add powder if you worry it’s too wet. My mix took 4 tablespoons. Any more and it will make the fizz bubble up and you don’t want that.
- Once you have the snowball consistency, pack it down into the mold and compacting it into place.
- Leave the molds out until dry. They will come out of the pretty easily. If they are still wet, they will not come out without coming apart.
* If you’re making a smaller batch or want to have a few different types you can add essential oil drops after they’re dried by directly dropping 2 drops of each oil on top of the steamers. If giving as a gift, store in a nifty jar, such as a mason jar.
TO USE:
Adjust shower to desired temperature. Open pouch and place tablet on the floor of the shower away from the drain, where a steady stream of water will continually release comforting vapors from the tablet into the air.You can sprinkle a little bit on the steamer to get it started, but it will fizz away too quickly if you put it directly under the water stream. Sit in your steamy shower, breathing in the awesome aromatherapy benefits of the blend you chose to use!
-
DIY Crate Coffee Table
Mom & I made a coffee table out of crates and boredom. We crafted a cheap, easy, functional and practical table in about an hour and a half total. Here’s what you need if you want to make one, too:

All done! Now to fill it with records and books! SUPPLIES
* 4 x Crates ($40 w/o a coupon, plus tax, but Michaels *always* has coupons.)
* 1 x Base (Plywood about 3/4″ thick, cut to 27.5″ square. $27 for a 4’x4’x3/4″ panel. I used the extra for making shelves on another project. You might be able to get smaller panels for cheaper but you need to cover the entire base.)
* 4 x Casters (2″ or 3″ swivel – I got these for $14 total after tax.)
* Stain (About $4 or $5 for 8oz or $8 for a quart. It only needed one coat, but we got a quart as we had other projects.)
* 16 screws for casters (Cost = pennies! I used ones I had around the house)
* 16 nails or screws to attach crates to the base (Same as above)
* Optional – 4 corner bracesTOOLS
* Drill or screw driver to screw in casters to the base.
* Hammer, drill or screw driver to attach crates to the base.
* Paint brush & paper towels for stain (Same as above, but $4 tops)
* Jigsaw or saw if you don’t have the plywood pre-cut at the lumber store. I have a jigsaw and love any chance to use it, so…INSTRUCTIONS
* Screw in the 4 casters 2″ in on all sides.
* Stain all 4 crates inside and out and the top and sides of the base.
* Position crates on top of the base and affix them with a couple of screws or nails and THAT IS IT!
ETA: We added 4 corner braces inside the empty center to hold a square “shelf” (I just cut a little square from the leftover plywood) to hold a vase, pinecones, Christmas ornaments or any other decorations we want. Fun!
Mom & Grizzy shopping for materials 
Staining the crates for the coffee table 

Cutting the base for the coffee table 
Measuring placement of the wheels for the cart base 
Wheels on the cart go round and round 
Staining the base 
All done! Now to fill it with records and books! -
Repurposed Yankee Candle Jar
I’ve held on to some empty Yankee Candle jars knowing they’d be good for something, but the adhesive they use on their labels was impossible for me to remove. It’s stickier than a whore in a honey factory. Sorry, I don’t know why I went there.
I didn’t use the jars because the leftover gunk made them ugly and tacky (tacky, in the sticky sense. I didn’t want to use the word “sticky” again and, well, now I’ve gone and used it twice.)
So, the jars. Sticky and ugly. Years pass.
Today, I got creative (i.e., procrastinating from things I should be doing) and decided to dig out the jars and try cleaning them again. Lo! [Insert sound of clouds parting and angels with trumpets doing their thang.] It turns out Tea Tree Oil is the rubbing the jars needed. It wasn’t like a Pledge commercial where it’s Swish! One swipe and all the dirt is gone. But it didn’t require a ton of elbow grease or time. Cleaned and dried, I added a chalkboard label from a pack Christian got me for Christmas. (True love, people.) Now I’ve got a jar that’s full of ideas.


-
Window Pane Turned Picture Frame
I found a junky old window, cleaned out the broken glass and caulk, got four new pieces of glass cut to size and ordered basic mats online which I trimmed with a box cutter. Then I chose four photos of bugs & a bird that I took at the Rock House, printed them out on photo paper and voila! A window pane turned picture frame for our dining room.

Back side before cleaning. 
Front side. Glass & caulk all cleaned out. 
Trimming mats. 
Two down. Two to go. 
All done! 
Pretty as a picture! -
Repurposed Frames
Mom mailed me two old picture frames that I’d hoped to use for two pieces of art. Unfortunately, the pictures were actually glued to the glass in such a way that would make it impossible to remove them without a huge amount of work, muscle and cursing. Instead, I repurposed them into bulletin boards. Super easy. All you need is adhesive spray and cork board that you can get in sheets at Michael’s or other arts & craft supply stores.


-
DIY: Brown Sugar Body Scrub
 My favorite body polish by Fresh costs $65 for a 14 oz jar! (GULP!) It’s heavenly. It exfoliates gently, smells…well…fresh, and leaves my skin feeling like silk. It’s ridiculously overpriced and not something I splurge on very often.
Instead, I perfected a recipe that could pass any side-by-side comparison and have been using it during every bath time since, making up for all the times I didn’t because I’m a cheap bastard. Now I’m a smooth, soft, shiny, silky happy cheap bastard!
The basic formula is two parts sugar to one part oil. So, for every cup of sugar, you’ll want 1/2 cup of oil. I used a combination of brown sugar & sugar in the raw (a/k/a turbinado sugar for the larger crystals) and a blend of coconut & olive oil.
My exact breakdown was:
1/2 cup brown sugar
1/2 cup sugar in the raw
1/4 cup olive oil
1/4 cup coconut oil
Essential oils (any blend about 10-15 drops total)You can use ANY sugar or oil you like or have on hand…jojoba, almond, olive, white, brown, turbinado, whatever. As long as you keep that basic formula of 2 parts to 1, you should be good to go. Essential oils are nice to enhance the smell, too. For this scrub, I prefer citrusy scents like orange, lemon, lemongrass (Is lemongrass citrusy? I dunno, but I dig it.), grapefruit and the like.
I use my finger to stir it up beforehand as the sugar settles to the bottom between uses. I use about a tablespoon each for the backs of my arms and elbows, my décolletage, knees and feet. Be careful of a slippery tub and *pat* yourself dry to retain that silky smooth feeling.
SUPPLIES:
You’ve probably got sugar and some sort of oil.
Essential oils are super cheap and available in local health stores and Amazon, of course.
I got these cute little labels from MyOwnLabels.comENJOY!

-
DIY: Bombs Away! Bath Fizzy Recipe
Lush makes the best bombs in my opinion (Phoenix Rising is heaven on earth to me), but there is no Lush store near me. Bombs are a little extravagance I treat myself to on a rare occasion because at the average cost $7 a plop that adds up! They’re super easy and cheap to make. How have I not been doing this for years?
Granted, I’ve not mastered the art to the level of imitating the aforementioned Phoenix Rising in both appearance and function, but my first batch (lavender and coconut oil) was soothing and made for a lovely bath. Also, because it’s been so humid at the cabin (92% humidity? And it’s not raining? The air is THICK!), the moisture was drawn into my bombs as they dried and “activated” the fizz. Not ideal. Made them a little messy, too.
The fizz is really for fun, though. It’s the Epsom salt, coconut and lavender oils that made for the soothing night time dip in the tub. And mine still did fizz a bit. Next batch I’ll make when the humidity breaks or will let them set in a sealed tub with some rice to help draw moisture away. (I’ve read that I can bake them with the oven door open at 170° for a few hours to prevent this. I have not tested this out.)
Here’s how I made my homemade bath bombs at a fraction of the cost. There are a million recipes online and I spent way too much time perusing them all before attempting to MAKE one. I was the band that wastes rehearsal time coming up with their name and logo and never actually makes music.
“Just make one then tinker later,” I finally told myself. So I did!

This is a very, very simple recipe and for a small yield and a great place to start for a beginner. I’ll update this post as I perfect it or get feedback so BOOKMARK IT, FOOL!
Meanwhile, this worked for me and I enjoyed a lovely bath:
1/2 cup baking soda
1/4 cup citric acid
1/4 cup epsom salt
10 drops essential oil(s) (I only used lavender my first time. Simple and wonderful.)
2 tbsp organic coconut oil, warmed to a liquid.
Optional: scents and/or a couple of drops of food coloring.* I did not use these my 1st time.Combine all ingredients. Add a bit more coconut oil if needed. It will be the consistency of moist sand. If it’s fizzing, there’s too much moisture so add a little more dry ingredients.

Press into muffin tin or silicone mold oiled generously with coconut oil. As you can see, my small batch (heh) yielded 7 mini bombs. I used two plus some crumbles when I bathed, but I like the option of only using one if needed and adding more. You can always add, but you can’t put the toothpaste back in the tube, ya know?
Let them harden for 24 hours in a dry place. If it’s really humid, try letting them set in a sealed plastic container with some rice or silica gel to draw moisture away from the bombs. (I gotta try this myself along with the aforementioned oven trick.)
Remove them from the mold and they’re ready to package or use. I used cellophane bags and labels from MyOwnLabels.com for gifts. For myself, I keep them in a mason jar (of course!) with a little rice at the bottom to help wick away moisture.

If you don’t use them right away, again they need to be stored in a dry place.
Now that I’ve got this one under my belt, I’ll try adding blended scents, oils, colors, and even real bits of lavender buds, flower petals, cinnamon sticks and such.
*Make sure scents are cosmetic grade. I don’t use them, so not sure what to tell ya. Also, some essential oils like peppermint and rosemary are bad for people with high blood pressure. Huh. Who knew? I’m no doctor, I just read that while researching all this stuff. So, know your body, check with your doctor, etc.
-
Baking Soda Chrome Cleaner
So, I’m guessing everyone reading this already knew that baking soda cleans chrome like new.WELL NO ONE TOLD ME!
I just learned this today and am now looking for anything and everything with a shiny surface to scrub!
Okay, so I received my birthday gift to myself in the mail today. A vintage Swing-A-Way ice crusher in avocado green exactly like the one we had when I was a kid. It’s really for Christian Finnegan, because he likes to chomp ice which his dentist said is a no-no. I used ours every Saturday & Sunday morning & sprinkled Kool-Aid powder on the ice to make a trailer trash sno-cone.
The one I won on Ebay came with a very stubborn strip of adhesive from old masking tape, probably from a garage sale. It was STUCK like concrete and plaster. A quick Google search told me that the metal was chrome and to use baking soda to polish it. Well, sure, but what about that strip of plaster? See for yourself!


-
DIY: Sinus Soothers
I am constantly sniffing and blowing snot and fighting off Paquita’s aggressive attempts lick it out for me. (What is it with dogs and snot?) Christian has sinus issues, too, so I found a recipe on Pinterest for making homemade shower soothers (they used to have these by SudaCare in stores and no longer carry them from what I can tell).
Here’s what you need to make about 10 mini-muffin-sized sinus soothers*.

1 cup of baking soda
1/3 cup of water
Essential oils: eucalyptus, rosemary and lavender
Muffin tin & liners*I made mini ones because I hate wasting. If one mini tablet isn’t enough, it’s easy to add another to the tub. If you know you take long showers or want the extra strength you might wanna make regular sized tablets. To make 12 of them, use 3 cups of baking soda & 1 cup of water.

1) Add baking soda to a mixing bowl
2) Add water a little at a time until the consistency is like a thick paste.
3) Spoon in to your muffin liners/tin, and leave them be for about 12 hours. If you’re like me and don’t have patience, you can bake them for 20 minutes at 350°. Also, baking helps if you’ve misjudged your mixture.
4) Once they’re set, add a few drops of each essential oil. For some, I dropped in 2 drops each of eucalyptus, rosemary & lavender. For others, I dropped in 3 drops of eucalyptus & 3 of peppermint. I wanna see what works best for me. For regular sized muffins, double the amount. Play around if you like as long as you’ve got the eucalyptus in there.
I stored mine in an old Mason jar (of course!) and made a little label on top using craft paper. When you’re ready to use them, remove the paper liner and put them anywhere on the floor of the shower.
NOTE: Rosemary & peppermint essential oils can be bad for people with high blood pressure and stuff. I don’t know about other essential oils or risks. As I’ve mentioned before, know your body, consult your doctor, etc.

-
Bath & Birthday Works
Happy birthday to me! And my mom and my sis-in-law. As a gift to us all, I made a bunch of indulgent little gifts.

First and BEST, I made some brown sugar body scrub to mimic my favorite body polish by Fresh that costs $65 for a 14 oz jar! (GULP!) It’s heavenly. It exfoliates gently, smells…well…fresh, and leaves my skin feeling like silk. But it’s ridiculously overpriced and not something I can splurge on very often. I perfected a recipe that could pass any side-by-side comparison and have been using it during every bath time since, making up for all the times I didn’t because I’m cheap. Now I’m a smooth, soft, shiny, silky happy cheap lady!
Second, I packaged my favorite fire starters in little sack with wicks sticking out of them. Now, personally, I just burn the firestarter on its own, but they’re not very attractive. Hopefully the paper sack will burn enough to ignite the ugly starter. If not, lighting the fire starter itself is guaranteed to work. They are crazy efficient and pennies compared to the expensive logs sold in stores.

Third, I made bug repellent citronella candles. I love burning candles, but dayummmm they’re flipping expensive! To top it off, so much wax ends up leftover and wasted. After doing some research, it turns out most if not all are made with paraffin wax and synthetic citronella, not the essential oil with true protective qualities. Huh. How about that?
I chose to make hand poured soy wax (natural and, hey, soy beans are almost entirely farmed in the U.S.A.!) and citronella essential oil (the real deal). This was the trickiest project as it turns out candle-making is practically science. Once I got it figured out, I made my gifts. I hope theirs work as much as mine does. I started out small to save on expenses for the inevitable mistakes. Now that I know my little one is working, I’m gonna make larger ones in recycled pails, jars and cans which are better for the open air patio.
 I also threw in some homemade soap with real bits of lemon zest and drops of lemon essential oil. Mmmm, fresh & clean smelling and so great for the kitchen. Honestly, I’m not sure I’ll keep making my own soap, though. So many people make amazing soaps and soap isn’t that freakishly overpriced like everything else. It’ll depend if I find a recipe or two that I love so much that I have to have more. And I need to either get real molds or a proper soap slicer. I used recycled yogurt cups which are the right size and shape, but I had to cut them with a butcher knife which made one break and the others look sloppy with cracks in them. Drat.
Finally, my second favorite but a close race for first, I made some bath bombs a/k/a bath fizzies. Lush makes the best bombs in my opinion (Phoenix Rising is heaven on earth to me), but there is no Lush store near me. Also, as I near the end of this post, I see the main trend is that I’m cheap. Let’s say frugal. Bombs are a little extravagance I’d treat myself to on a rare occasion because at the average cost $7 a plop that adds up! They’re super easy and cheap to make. So much so, it’s like the body scrub…how have I not been doing this for years?
Granted, I’ve not mastered the art to the level of imitating the aforementioned Phoenix Rising in both appearance and function, but my first batch (lavender and coconut oil) was soothing and made for a lovely bath. Also, because it’s been so humid at the cabin (92% humidity? And it’s not raining? The air is THICK!), the moisture was drawn into my bombs as they dried and “activated” the fizz. Not ideal.Made them a little messy, too. The fizz is really for fun, though. It’s the Epsom salt, coconut and lavender oils that made for the soothing night time dip in the tub. And mine still did fizz a bit. Next batch I’ll make when the humidity breaks or will let them set in a sealed tub with some rice to help draw moisture away.

I had a few more in the works –bath salts, refreshing spritzes, bug spray– but my package was late enough as is, so look out ladies! Christmas is just around the corner.
I’ll provide instructions for each over the next few days or weeks. Meanwhile, you can read about them online and stock up your supplies. I had no idea essential oils were super cheap and available in local health stores and Amazon, of course. I’d have been doing this ages ago!
Other resources:
Brambleberry
Bulk Apothecary
My Own Labels -
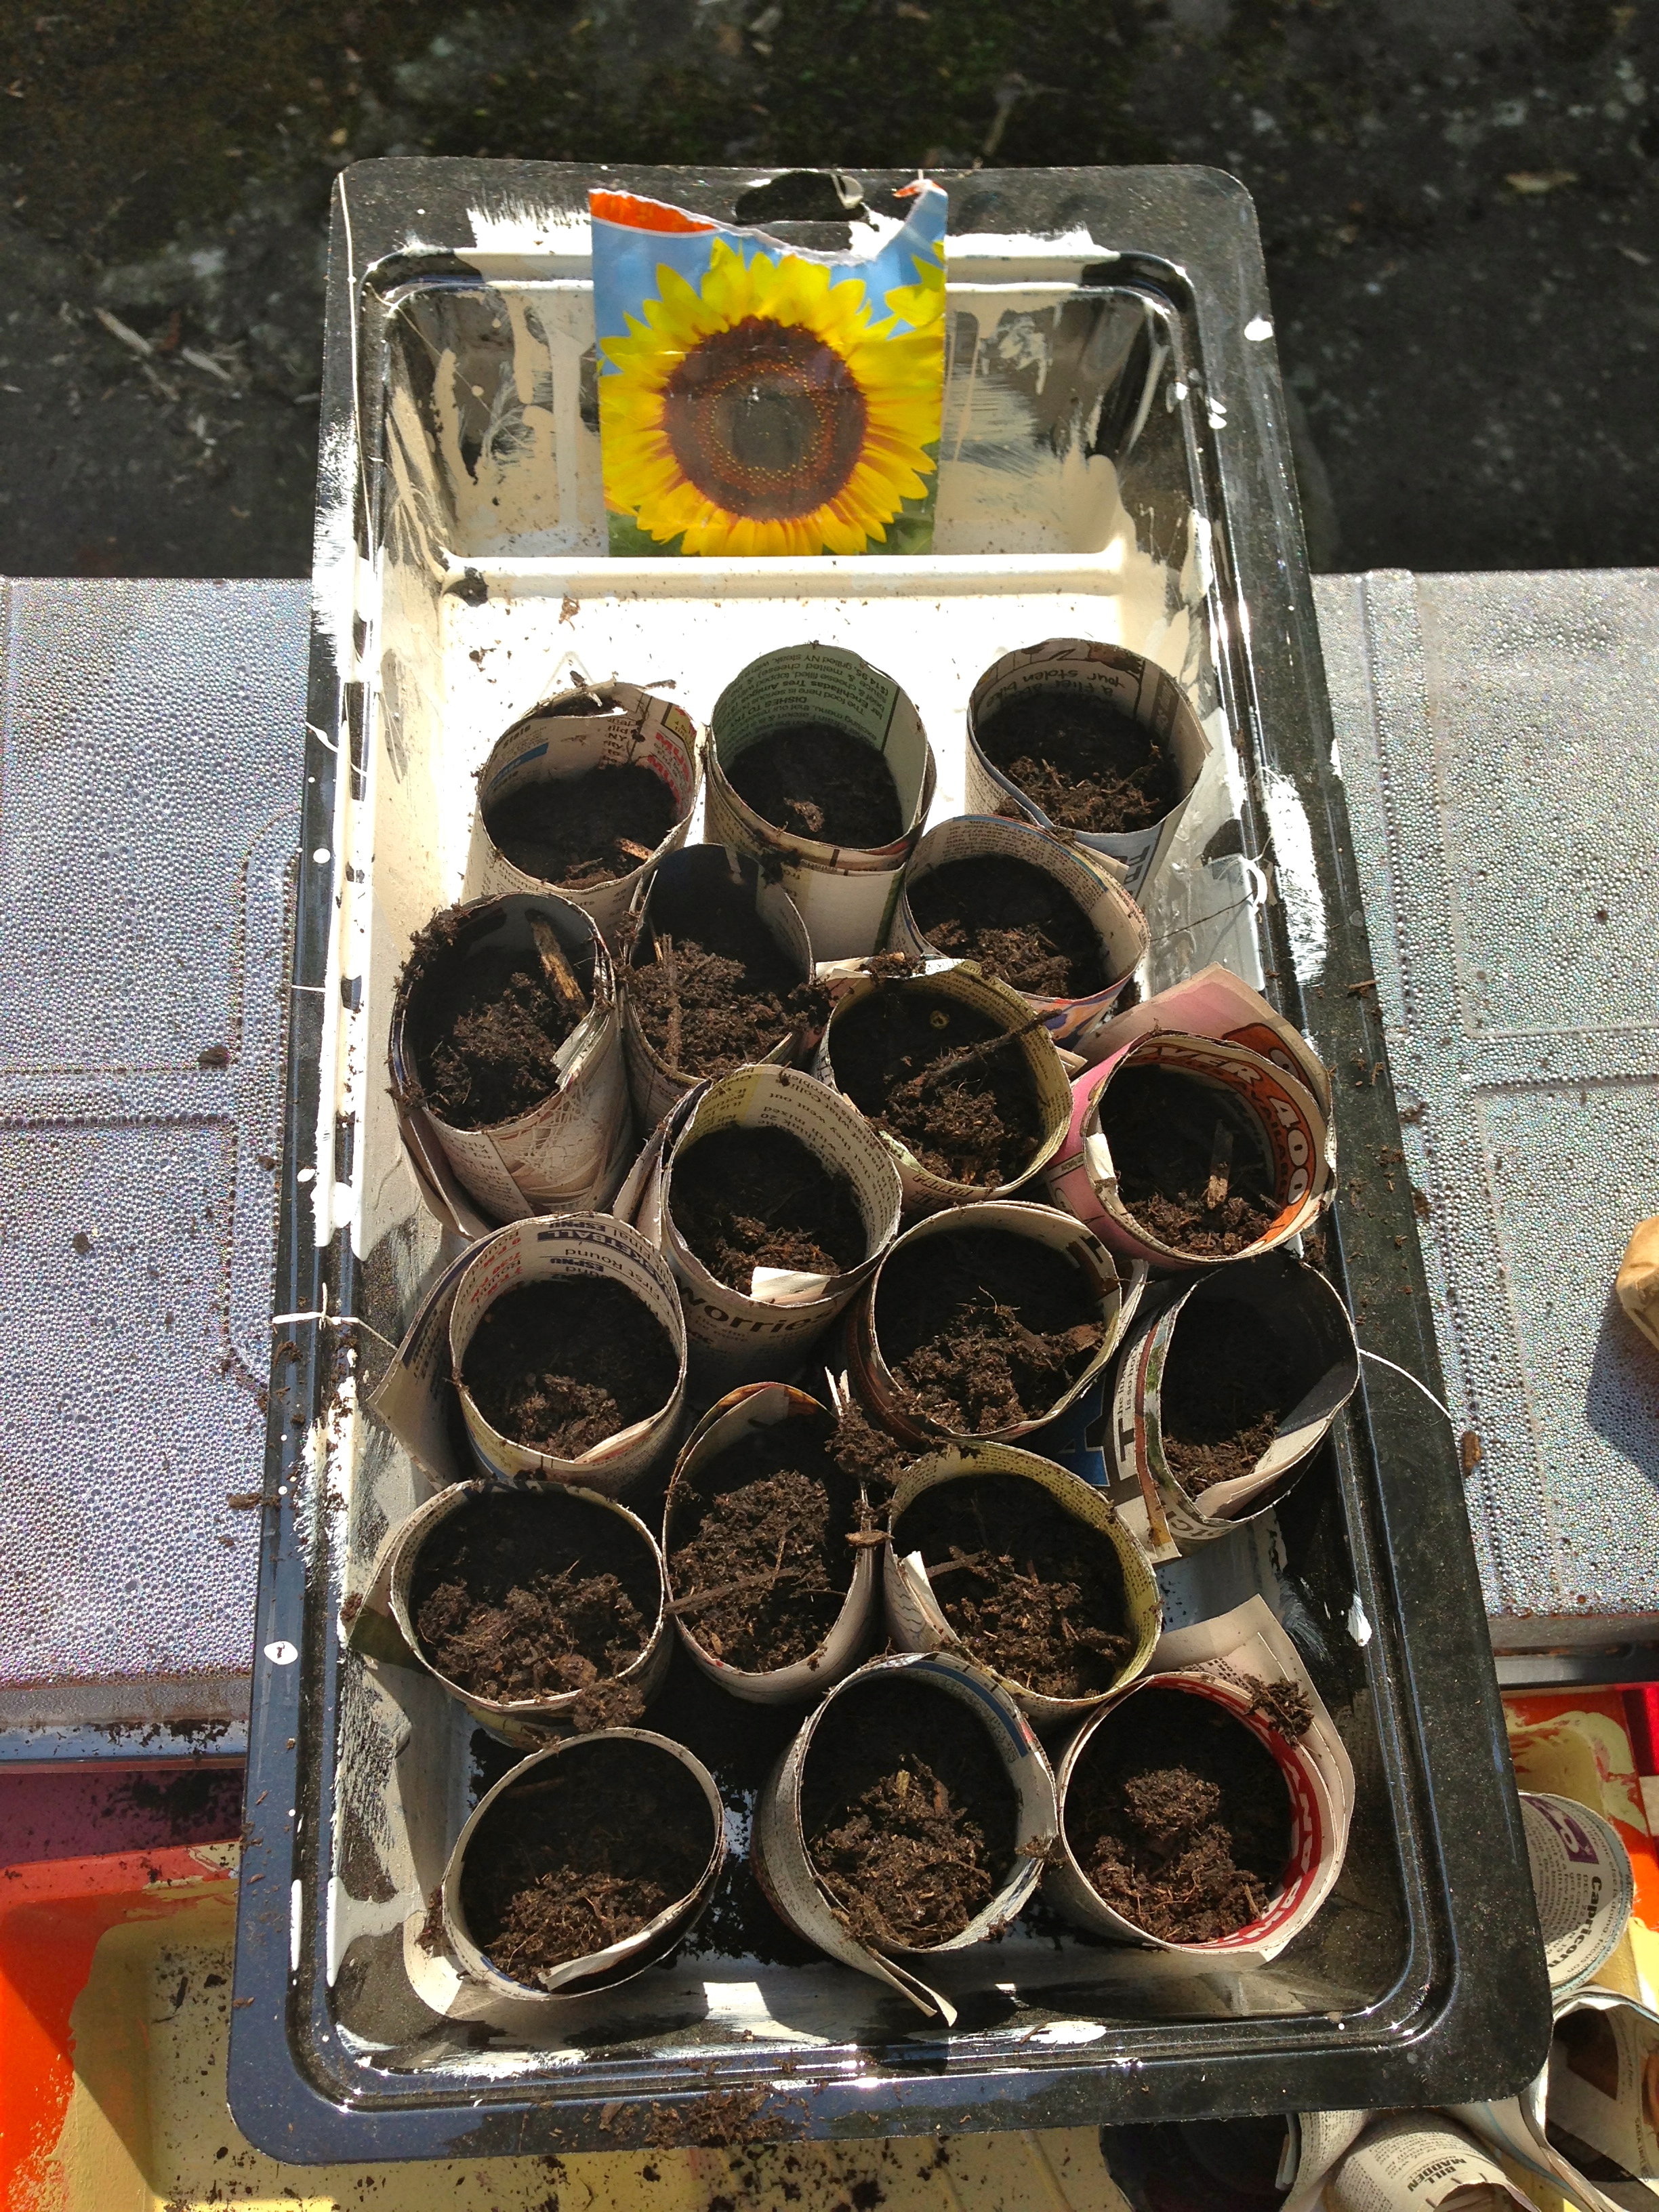
Paper Pot Maker for Eco-Friendly Gardening & Party Favors
This June at the Rock House I’m seeding plenty of pots and staying here to watch over them in their early, delicate, needy stage. In anticipation of this, I’ve purchased this adorable little paper pot maker that recycles newspaper into seed-starting containers with no glue or tape necessary. Once the seedlings are ready to be transplanted outside, just plant them – pot and all. Here are three little samples I made so you can see what they look like.
 How eco- and wallet-friendly can you get? But looking at the results –the cute little paper pots– I thought the pot maker could be used for party favors or place settings.
To test it, I made a few little personalized pots out of brown craft paper, wrapping paper scraps & newspaper and, if used for food, I lined some with wax paper. You can tie them with ribbon or a piece of twine and, to personalize it, write guests’ names on the outside in colored sharpie or paint pen that they can take home with them. My tests were used with the limited supplies I have here at the cabin. If you have access to nice printed or colored paper, you can really make a nice little party favor.
 And, now that I’m thinking about it, if you make the pots a little taller, you can tie them at the top after they’re filled. In that case, you can have little takeaway gifts like bath salts (for the bath, of course) or confetti to throw at a wedding or…oh, man, the possibilities are endless…like:
M&Ms for any holiday
Hearts
Kisses
Red Hots
Peppermints
Gummy bears
Jelly beans
Candy corn
Trail mix
Nuts Raisins
Gumballs
Fresh cherries
Raisins
SaplingsWhat other ways can you think of to them?
-
An “Epic” Date

After kicking off my gardening project, I drove home from the cabin so I could take my protege Jeaniah to a preview screening of “Epic” at the Museum of the Moving Image. When I picked her up, she and the other Hour Children kids were having a craft day with volunteers from the Kabbalah Center. We made jewelry, got professional photos taken and planted some flower seeds which took about 20 seconds. Throw some dirt in the peat pot, add some seeds, top with more soil, add water and voila. Four days later they sprouted.
It was a great reminder of what I said in my earlier post: gardening is much more simple than the Internet would have you believe. Don’t be afraid! Jeaniah wanted me to keep both of our pots so I can plant them at the cabin. I plan to find a special spot for our little flower pots to grow together. It’s lousy with symbolism.
Anyway, on to the movie. We were excited and surprised to learn that the director of “Epic”, Oscar winner Chris Wedge, was at the screening and would participate in a Q&A afterward. COOL! The movie is about a teenage girl who is transported (shrunken to the size of an insect) into the forest where she helps the “Leafmen” battle the dark forces after the forest Queen is killed. The movie itself was in 3-D and, damn, animation these days is simply breathtaking. I got dizzy a few times “flying” with the Leafmen on their hummingbirds that they rode like horses. So clever. Check out Metacritic for comprehensive reviews, but we gave it our thumbs up as did the other kids in the audience.
 We also enjoyed the Q&A with Mr. Wedge who was really casual, funny and gracious with his time. Jeaniah seized up with shyness when it came to asking for an autograph, so I asked on her behalf. We wanted to get it mostly as proof to the kids at school that she’d seen the movie before it was in theaters. Last time we did this (a preview of the “Croods” which was okay), no one believed her. So, this time we kept her program and autographed ticket stub for her to use to “show off”. Take that, non-believers!
Christian met up with us at Pizzeria Uno and during our drive home he told her about my undying love for David Lee Roth. When he showed her pictures of Diamond Dave, she burst out laughing and said, “He looks like a GIRL!”
I spent way too much time defending my love and trying to find a better picture. None were to be found. He’s pretty ridiculous in all of them and yet…sigh.
I can’t wait for the day I meet her husband and can tease her about how she wore Justin Bieber perfume.
-
Broadway Bound
My niece turned 10 years old! As my gift to her, I’m treating her to a trip to the Big Apple. I filled a box with some NYC trinkets and a homemade boarding pass so she’d have something tangible to open and think about before the actual trip happens. Happy birthday to her!

A bell’invito stationery box filled with some NYC goodies. 
Boarding pass to NYC & tri-fold holder. 
Good for one round-trip airfare to NYC! -
Firestarters & Cabin Bedroom Wall Before & After
For those of you with high testosterone levels, move along, there’s nothing to see here but more crafty, decoratey stuff.
For the rest of you, here’s an update to my earlier post about my Mason jar addiction.
It’s August, which in the Catskills means it’s campfire season! We had our first last night in the fire pit on our patio to keep us warm while we watched two episodes of “The Wire”. Cozy toasty and the smell still lingers in Griswold‘s hair, just another reason to snuggle my nose behind his ear. Anyway, while starting the fire with soggy kindling and newspaper, I was reminded that I wanted to make my own fire starters. I’ve saved egg cartons and leftover wax from candles all spring and summer precisely for this reason. Fire starters can be pretty pricey and why let all that wax go to waste? Bonus: scented candle wax gives added aroma.
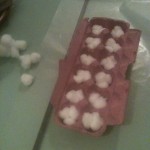
I stuffed cotton balls into the empty egg cartons, melted some wax (use leftover candles and Scentsy cubes that have lost their scent) in a makeshift double boiler (an empty can filled with the wax inside a pot of boiling water). Using a potholder & a pair of pliers to pluck the can out of the boiling water, I poured the melted wax over the cotton balls. Be sure to have wax paper under the cartons to save your counter, the wax will seep through. Use a toothpick to make sure the cotton soaks up the wax. Alternative materials to cotton balls are dryer lint and sawdust –they’re actually better but we don’t have a dryer or any sawdust piled up.
When we start our fire tomorrow night, I’ll cut off one “egg”, light the carton paper and see if my homemade starter worked. Supposedly they burn up to 10 to 15 minutes each, as long as, if not longer than a store-bought starter.
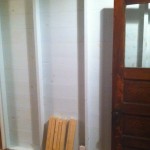
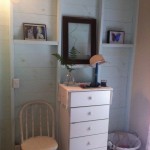
Now, onto the bedroom. The guy who restored the home from 2001-2007, didn’t put up drywall in the bedroom. It’s a style choice of his which we kind of like. We painted it a very light blue, but without drywall there’s no real way to hang anything. Then I had an idea! I got some 2x4s cut down to size which I painted & installed horizontally between the studs to create “shelves”. For extra security, I added a little “ledge” (like a dowel rod but not cylindrical) with some wood glue and two carpet nails. I thought it was a pretty good idea / solution. I placed some items on the ledges for picture purposes, but I’m not sure what will finally end up on the shelves. Whatdya think?
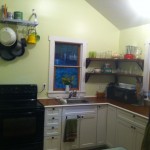
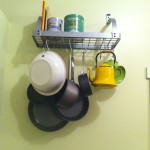
Update: I forgot to include pictures of our fresh coat of paint (Sassafras Tea) in the kitchen & dining room and the new pot rack for the we hung above the stove. (Thanks to my in-laws for my birthday gift card to Crate & Barrel to help pay for it!)
(Full Rock House photo set on Flickr.)


-
Step Away from the Mason Jar!
I need an intervention to cure my mason jar craft addiction. In addition to turning a tiny jar into a sewing kit, I’ve made two mason jar match holders (simply stick a bunch of matches in a mason jar and hot glue some sand paper to the circular portion of the lid. But be sure to get strike anywhere matches) and mason jar salt container spout thingy. Lest mason jars have all the fun, I ate over a pound of cornichons so I could turn the empty jars into light fixtures.
I’ve also been busy priming and painting wooden picture frames, a hat stand, a hideous lamp, a wooden plate shelf/rack and plain old 2x4s. The guy who restored the home from 2001-2007, didn’t put up drywall in the bedroom. It’s a style choice of his which we don’t mind. We painted it a very light blue, but without drywall there’s no real way to hang anything. So, I got some 2x4s cut down to size which, after the priming is dry, I will paint & install horizontally between the studs to create “shelves”. I think it’s a pretty good idea / solution. We’ll see!


-
5 Minute Mason Jar Craft Project
At my book launch party, Nichelle Stephens gave me a yummy little cupcake in a jar. I thought the jar itself was so cute, I hung on to it figuring I’d find a use for it some day. And the day has come! Mindy Raf told me about buzz feed’s 41 things to do with mason jars which led to a Pinterest wormhole which led to this. I had a cheap little emergency sewing kit in a case that always popped open in my junk drawer. I also happened to have some batting (don’t ask) and a scrap burlap sack that I got at a junk store for 50 cents and voila! A little sewing kit pin cushion thing:


-
Butterfly Kisses in My Hair
>

-
Why, yes, that is my taxi cab butter dish from Our Name is Mud!
-
Before & After
***Update: New and final after photos added to the above link on Friday, July 25, 2003.